|
Having good photographs of your old toy collection is important
to the collecting experience. Good photos are useful for insurance claims, EBAY
auctions, and collector correspondence. Also, they document your toy
collection for posterity. This article offers some ideas on how to get better
photographs of old toys and how to use digital photography in
today's Internet world.
|
|
Cameras
If you plan to use your pictures to send by Email, or to use on Internet
auctions, get yourself a digital camera. It is too time consuming and costly to
take prints and then digitize them on a scanner. With a digital camera, you do
not incur the costs of having the prints done - most of which will not be
useable anyway. With a digital camera, you can take huge numbers of images and
sort them out and improve them on your computer (of course you will also have to
get yourself a computer).
The resolution needed is really not very important for Internet
use since sufficient bandwidth is currently not available to send high
resolution pictures that can have file sizes in the multi megabytes. A 2.2 mega pixel
or higher camera is fine. Close focusing capability is important. Make sure the
camera can focus, either automatically or manually, down to 6 cm or closer.
All of the cameras will have a means of downloading your images
into your computer. Those with "docking" cradles and a USB interface
are the most convenient but all will have a working system.
|
|
Lighting
All digital cameras will have a built-in flash - turn it off! These poor flash
units are only useful in emergencies and for sunny day shadow fill-in. If they
are used for toy photography, the results will be disappointing. The pictures
will be flat and have a harsh shadow behind the toy.
Use either a separate incandescent lighting system like the one
shown here ***photo of lighting system ***,
or use an external flash that can be positioned to give and indirect lighting
effect by bouncing the flash's light off a white ceiling or photographic umbrella.
See illustration. It will take some experimentation to get the results you
want. Just remember that the objective is to diffuse your light to soften
shadows and to create a primary, or stronger, and a secondary, or weaker, light
source if you can.
You can use natural, sometimes called "available"
light for your photos to good effect but consistency is the problem since the
sun's angle is constantly changing and clouds come and go but give it a try.
|
 |
 |
| These two
photographs were taken by the same photographer, Judith Lile, one year and
much experimentation apart. The ringmaster was photographed using a
built-in flash and he was placed too close to a background. The result was
a flat, lifeless image. |
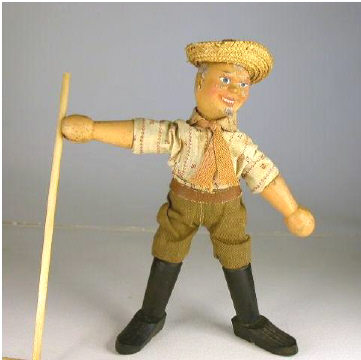
After
some practice, Judith took this photo of a farmer. Her lighting consisted
of two inexpensive incandescent lights positioned high and to the right
and left of the subject. The resulting shadows are diffused. The subject
looks very natural - you aren't aware of lighting. Shadows are soft. A
very nice toy portrait wouldn't you agree? |
|
|
Positioning
Try to find enough space so you can position your subject well away
from a plane background. Use props to good effect. And get close! I see too many
toy photos with tiny images of the subject of interest but great images of the
table or sofa they are on. If your photos aren't good enough then you aren't
close enough.
|
 |
 |
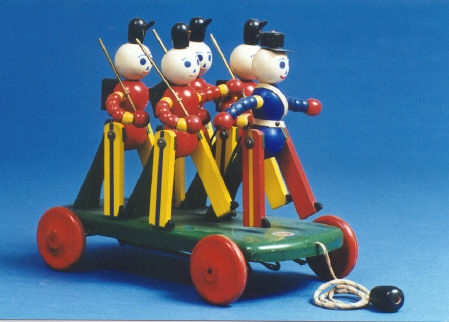
This photo of
the Ted Toy-ler Marching Squad illustrates a few principles of composition
and lighting. The lights are positioned with a strong light high and to the
subject's front and a fill light high to the subject's right. This gives a nice
3-D effect. The frame is filled with the subject who is positioned
slightly to the left of center to provide a space to move into to suggest
motion. A nice medium blue paper background was used. The paper extends
3-4 feet in back of the subject which produces the darker background
effect in the upper portions of the photograph. |
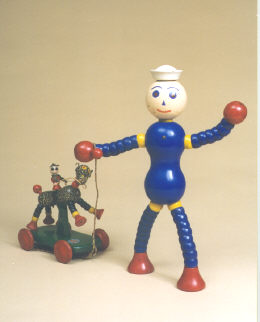
Here, two
Ted Toy pieces are working together to make a more interesting
composition. The background material for both of these photos is
photo paper rolled out over a dining room table. The paper curves away
from the subjects which produces an increasingly darker background as you
look higher in the photograph. |
|
 |
 |
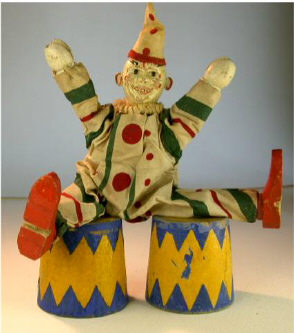
In this photo,
Judith experiments with
back lighting the subject. The addition
of circus prop adds interest to
her clown composition. |
Judith made
this fine portrait of a nice
Schoenhut clown. Looks like it was made
in a studio doesn't it? Nice and close with lighting positioned high and
slightly behind the subject. Front lighting used to fill. Good 3-D
effect. |
|
|
Tripods
Digital cameras aren't very fast. That is, their "shutter"
speeds are fairly slow. So for best results, use a tripods to steady the camera
during shooting. You will notice a great improvement in image quality
particularly in close-ups. A good, sturdy tripod will cost you about $100-$150
and well worth the price.
|
|
File Sizes
If you are going to make prints of your photos, you will need to take your
original images at the highest resolution possible with your camera. This should
be at least 2.2 mega pixels to produce an 8 1/2 by 11 print. You should use no compression
- that is, use bit mapped (bmp) quality mode. You can derive smaller, jpg
compressed, files from the bmp files. A good image editor such as PhotoEditor,
Corel, PictureIt!, and one of my favorites, IrfanView (a free download). In
IrfanView, you can size the image easily and precisely to make it ready for Web
publication or Email.
|
|
So, give it a try.
|